![[ Rescue Dynamics Logo ]](../../images/resqlogo.gif) |
Outdoor Article of the Month - January 2000 |
Skiing Safely in the Wilderness - A Heli-Ski Primer |
© 1999 Cyril Shokoples
(photos courtesy Cyril Shokoples)
|
Outdoor Article of the Month - January 2000 |
Skiing Safely in the Wilderness - A Heli-Ski Primer |
© 1999 Cyril Shokoples
(photos courtesy Cyril Shokoples)
This article is designed to educate the first time heli-skier / boarder and also to refresh the experienced skier's and boarder's knowledge of wilderness skiing techniques, hazards and safety.
Clothing
As a general rule, the clothes you wear heli-skiing are pretty much the same as you would wear for a day of skiing or boarding at a mountain ski resort. Although you will likely not buy an entirely new wardrobe for a day of heli-skiing, if you have a choice of clothing to bring, some things are better than others. A one piece ski suit has advantages over a jacket and pants when you fall in deep powder. On very cold days, mittens are preferable to gloves as they keep your hands warmer. Also on the colder days, a neck tube can help keep you warmer. A warm hat is always in order and is easily carried.
Even on warm days, the temperature can be a lot colder in the shade or in windy locations. Best to be prepared. Dress in layers with a thin light weight layer next to your body then another layer (or perhaps two for colder days) under your jacket or suit. Consider long johns under your pants if that is what you normally require to keep warm. Check the weather forecast the night before and again in the morning for an idea of what conditions you may expect.
Good sunglasses that reduce UV radiation are a must even on cloudy days. Goggles are very helpful on days that are cold or windy or foggy. Some goggles have lenses that enhance visibility in flat light. It is likely best to bring both sunglasses and goggles for a day of heli-skiing. A camera is also highly recommended. The new small lightweight inexpensive cameras are a good choice as you don't have to worry about your expensive SLR camera being accidentally damaged.
As there is very limited room in a helicopter and important weight restrictions, please do not bring a rucksack or daypack. You should carry everything you need with you and nothing can be left in the helicopter.
Equipment and Preparation Do whatever you can to get in shape before you arrive for your day of heli-skiing so you will enjoy it more with less effort. Skiing is always good training for skiing! Get out to your local hill or to the mountains to get ready for your helicopter assisted vacation. Keep in mind that heli-skiing can sometimes involve landing at 10,000 feet or 3,000m above sea level. The reduced amount of oxygen available at the top of a run can effect those who arrive from a sea level environment. If you live near seas level, it is best to spend a few days acclimatizing at a mountain resort before going higher. Although any reasonably fit person can enjoy a day of heli-skiing, it helps to get out and take a ski or snowboard lesson or two at a mountain resort in preparation. Be sure to tell your instructor that you are going to go heli-skiing / boarding and ask for any tips that may be helpful. You should spend most of your personal preparation time on Intermediate (Blue) runs or harder. Concentrate on trying to ski or board down the fall line without having to resort to long wide traverses to avoid steeper sections. On skis, develop your rhythm and use your poles for timing your turns. Medium radius turns are fine. Being comfortable with a little bit of speed is helpful, but you don't have to be a speed demon. A time tested rule of thumb is that a generally fit person capable of consistently skiing or boarding down the fall line on Intermediate (Blue) runs at a mountain ski resort can probably heli-ski or heli-board with a guide without too much difficulty. Ask you instructor for an assessment of your abilities. It is impossible to tell how you will do before you go, but most people who take some time to prepare have a great time. Tens of thousands of people prove that every year. As far as skis are concerned, there is only one way to go. USE FAT SKIS! Fat skis virtually revolutionized the entire heli-ski industry. Heli-skiing was once the exclusive domain of the advanced master of skiing. Suddenly fat skis made heli-fun the province of the intermediate skier as well. Don't use your own skis unless you are an expert in back country powder and have heli-skied many times before. Fat skis make difficult conditions so much easier that it is ridiculous for the average skier to consider anything else. Normal ski poles are OK with an average to large size basket being better than a tiny basket, although both can be used. When your rental fat skis are set up for the day they will be adjusted to a binding release setting recommended by the manufacturer. This setting is based on your boot length, height, weight and skiing ability. It is best not to tighten your binding down higher than the recommended setting. Twisting falls in powder are very common and higher than recommended binding settings increase the risk of injury (particularly knee injury). The guides and ski technicians who set up your bindings must set them according to the manufacturers chart. If you choose to increase the setting, you should do so only after first skiing on the skis. If they don't cause you any problems you really have no reason to change them! Occasionally skiers will find that their bindings release prematurely. Often this is because of failure to adequately clean the bottom of your boots before putting them in the bindings. When getting out of the helicopter your boots are warm and the light snow instantly sticks to the bottoms and becomes ice. In addition, analysis of ski technique in powder often shows that prerelease may also happen when you lean back excessively or over rotate when you turn. This can produce higher than anticipated forces in the binding during your turns and the binding releases as it is designed to do. First clean you boots, then see if you can rectify any problem in your skiing. Finally, if all else fails, you may choose to increase the settings with the subsequently higher associated risk of injury. Snowboarding has it's own set of challenges. As a general rule, a snowboarder has to be slightly better than a skier to enjoy the choice powder turns on a sweet line. Traverses and flat sections can be very difficult on a board while they may be simple on skis. Taking along a set of "three section" collapsible ski poles and carrying them in the guest pack in the group can make those nasty flats a less painful problem. Having a skier assist or pull a boarder across a short flat section can often help everyones day go faster. Although your guide will take great pains to select the best line for the group, occasionally the weather, terrain or conditions can dictate where the group must go. When stopping near the group on your board, always try to stop on top of small rises rather than on flat sections or in small depressions. It can be hard to get going again on a snow board when you stop on the flats in deep new snow. As well, consider renting other gear if you normally ride on a racing board with hard boots. A softer board and soft boots are often better for the intermediate powder boarder. Real expert boarders can make their own choice as to what may be best. All snowboarders should bring along a collection of spare parts for their bindings, especially if there are any critical unique parts that may make the binding unusable if they get lost. It is common for bolts and binding parts to vibrate loose and fall off. This can totally ruin your day of heli-boarding. Come prepared for minor binding repairs.
Tips for your first day of Powder Skiing Skiing in powder is very similar to skiing hard packed slopes with a few specific differences. First, we need to dispel a popular powder myth. Many skiers think that you have to lean back in powder. That is almost never the case. Although in some conditions leaning back is warranted, it usually only causes fatigue, makes for unnatural movement and gives you tired thighs (quadricep muscles). Beginner powder skiers need a basic centered stance. The body should be relaxed with knees and hips gently flexed. The hands should be positioned comfortably out front where you can see them. If your hands trail behind you, the body often follows and you end up leaning back in that unnatural locked up stance. You have to exaggerate many motions including rotation to make a turn in that position. Leaning back is like trying to drive a bus from the rear. It is possible, but rather difficult. Another basic difference in powder skiing is that you are better off distributing your weight nearly equally on both skis. You are trying to ride a platform, much like a snow board. In fact the advantage of equal weighting is the very thing that snowboarders already know about powder. A large platform gives a great ride. Riding this platform in soft snow makes the skis float and gives that awesome weightless feeling of powder skiing. It also requires slightly better balance. One of the big advantages of fat skis is that your weighting can be a bit sloppy and you can get away with it in many instances. Try equal weighting none the less. Pushing down on the platform then allows a subsequent upward motion or unweighting that reduces the resistance of the snow and allows an easy turn. When starting out on your first turns in powder, start out slowly and push or bounce on both feet together to feel the springy nature of the snow beneath your feet. Try to find your new balance while floating in the soft snow. Make a few large to medium radius turns to get used to the powder snow and your new fat skis. Also use these first turns to let your brain relax. You did just get out of a helicopter after all. Your guide skis with hundreds of skiers every year and you don't need to impress the guide or anyone else on the first few turns. Experiment with your turns and your weighting. Some skiers catch on almost immediately. Most skiers new to powder take at least one full run to begin to get the hang of it. By the middle of the second run things often begin to go more smoothly. If you are finding things very difficult at first, continue with medium radius rounded turns and revert to basic ski techniques. Don't be afraid to use the snowplow turn or snowplow Christie if necessary to get things rolling. The deep powder snowplow is a valid technique for some instances but it is very tiring. On completing each turn, bring your skis back parallel to each other before the next turn. As the day progresses, even people who find things challenging at first are often linking turns more comfortably by day's end. Use your pole plant to initiate your turn. Be patient. Powder turns sometimes feel like they are happening in slow motion. Forcing them doesn't help. Once you get more comfortable in this new environment, you can try shortening the radius of your turns and picking up the speed. A wise guide once said, "It is better to start slow and pick up the pace, than it is to start fast and pick up the pieces". Once you speed up a bit you may find that the turns become easier to make. A bit more speed makes your skis float up in the snow and there is less resistance during turns. This all allows for better rhythm and you feel less fatigued. Speaking of rhythm, better skiers can now try getting a good flow of turns down the fall line. There is nothing better than linking turns with everything flowing in sync. Timing your pole plant, your turns and your unweighting can put you in an unbelievable world of floating motion where you flow through the snow. More advanced powder skiing requires a fair amount of vertical motion. Your legs move piston - like, up and down and somewhat side to side as your relaxed upper body moves more fluidly down the fall line. Face down the fall line and reduce the amount you rotate during your turns. The skiing is now mostly happening in your hips and in your knees. The body comes along for the ride and your poles help provide the timing. You are skiing loose and free. That's powder! Not every day is a perfect day and occasionally there are difficult conditions like wind crusts or variable snow. On these days it is best to ask the advice of your guide as to how to deal with the difficult sections.
Falling The worst part of falling in powder is often getting back up again! It is not at all like getting up after a fall on hard pack where the ground is solid beneath you. Sometimes a fall in powder can be frightening until you relax, laugh at yourself and realize a small amount of knowledge can get you up more easily. If you ski with a partner or friend, it can be much easier to get up with assistance. It also makes everyone's day more fun if you stop to help other skiers or boarders in your group to get up after a fall. In that way, the entire group is not forced to wait while one person gets themselves up and organized again without assistance. Before you attempt to get up, first turn your body so that your legs are below you (downhill) and your skis are positioned across the fall line. Then take both poles and place them together flat on the snow at your side. Position them in the snow across the fall line at a level above your hips and below your shoulders. Grab the middle of the poles and push up. Voila! With this extra surface area to push on you can get up easily. Ask your guide to demonstrate this simple technique if you cannot visualize this verbal description.
Welcome to the Wilderness So, you have taken a few lessons, gone out a few times at a mountain resort to get ready and now it is time for the big day. The world of wonder they call heli-skiing and heli-boarding is beckoning to you and you decide to answer the call. Then they make you sign that nasty waiver and doubt starts creeping into your mind. You are required to sign this legal document and there are no exceptions. It mentions the hazards of rugged mountain terrain such as avalanches, tree wells, cornices, crevasses, cliffs, clear cuts, stumps and all manner of other dangers. They don't even groom the runs out there! Suddenly you panic and consider not going on the ultimate ski adventure because of shear terror… This is a normal reaction to a new activity that does have some inherent risks. Just like driving a car, there many things that you can do to educate and inform yourself to avoid an accident before you even get in and turn the key. You will form a partnership with your guide and members of your group to make your day as safe as it can be. Here is a driver's manual to help you reduce the risks while wilderness skiing.
Ski Alert Heli-boarding and heli-skiing is a controlled experience. You are not allowed to go wherever you please as the wilderness is uncontrolled and many times deviation from the guides line can put you in peril. More problems can be avoided by following these three simple rules than by any other actions you can take on your own. Mountain Guides and Ski Guides are highly trained professionals that spend their lives safely conducting trips in the mountains. Safety is their business. The rest of the items mentioned below may further enhance your safety, but only if you remember to follow the first three rules. Whenever possible, stay in visual contact with the rest of the group and always stay near the tracks of your group and your guide. The guides are often familiar with a run and aware of many more hazards than you are. Don't go exploring away from the line the guide has chosen. If the guide veers off in one direction or another it is best to follow as there is usually a reason for most everything that they do. Some common unmarked hazards include buried rocks and tree stumps. Be alert to subtle changes of color in the snow. An area of darker snow may signal a rock, boulder or tree stump just below the surface. Unusual variations in height of snow may signal a buried hazard. Ski around but not over any spot you suspect hides a nasty surprise. Sometimes slight ridges in the terrain can also be rocky places. Such ridges will often be blown clean of snow. Rocks or boulders may lie just below the snow surface especially after a fresh fall of new snow. Some ski runs are in areas that have been cleared of trees by conventional logging (clear cuts). These areas often afford very good skiing especially during bad weather, but may have buried stumps, fallen trees, steep road banks, logging roads and occasionally even fences to watch for. Ski and board in control at a more moderate speed in such places.
When in Avalanche Terrain When in avalanche terrain, your guide may direct you to ski in his / her track or to ski one at a time or even to ski with a certain spacing between each skier. Maintain this spacing until directed to do otherwise. Do not proceed until the other skier has reached the safe spot designated by the guide or until they have skied the distance stipulated by your guide. When stopping to rest, always stop in safe places like the edge of a run, top of a ridge, large group of mature trees or on a small rise or outcrop. You will notice that your guide will often pick places like this as natural resting spots in any case. Avoid traversing onto large open slopes unless directed to do so by your guide. If the snow suddenly cracks or settles with a loud noise or "whompfing" sound be sure you notify your guide. This is a sign of potential snow instability. Stay out of steep narrow chutes or gullies unless your guide specifically says it is OK to enter them. When in confined terrain features like this it is often best to ski one at a time. When skiing on potential avalanche slopes keep an escape route in mind in case the slope begins to slide. Fluffy snow flying around your skis is not an avalanche. That is called good skiing. If an entire slope begins to move together, that is a slab avalanche. Call out to the group if you are caught. Make every effort to quickly ski downhill and off to the side. If you cannot get off the slope, then fight to stay on top of the snow. Discard your skis and poles. When the moving slow begins to slow down, place a hand in front of your face for an air pocket and extend a hand toward the surface if possible. If you are not caught but another group member is, then your guide will direct you. At the beginning of each day you will be briefed on how an avalanche transceiver operates and what you are to do in an emergency. Remember that your guide and the person carrying the small guest pack have an avalanche probe and a shovel to facilitate a rescue. Also remember that having skiers caught in an avalanche is a rare occurrence and following your guide's directions during the day is one of the very best preventative measures you have.
Skiing the Trees Even though there is nothing that can match the views from a high mountain peak on a clear day, experienced powder skiers will tell you that tree skiing during a snowfall is probably the best powder skiing that you can ever have. There are a few things to be aware of in the forests and open glades. First of all, it can be easy to get lost if you don't know where you are going. If you head in the wrong direction the forest may become thicker and there may be no chance of the helicopter accessing you in thick trees. Here it is doubly important to stay close to the tracks of your guide. Ski with a partner or in groups of three as directed by your guide. If your partner goes missing, stop and call out to see if they need assistance. Listen for your guide. They will often whistle or call if you don't rejoin the group in reasonable time. If you hear them calling and you have stopped because you fell or are taking a short break, return the call so the group knows where you are and can be sure that you are OK. Although more common in other mountain ranges of BC, tree wells can be a hazard to the unwary and have even led to a back country ski fatality in the past. Tree wells are a deep hole in the snow right next to the trunk of a tree. They most often form next to large tall trees in deep snowpack areas. The branches keep snow from collecting along the base and a tree well forms. The best way to avoid tree wells is to avoid skiing too close to the base of large trees. By skiing with a partner you can have rapid assistance if you fall in. If you fall next to a tree well, attempt to fall backward rathe than forward. If you fall head first into a tree well and your bindings do not release, it may be impossible to get out without assistance. All the more reason to ski with a partner. "Tree bombs" and "snow mushrooms" on tree tops are a phenomenon unique to heavy snowfall areas. Often heavy balls of snow or "mushrooms" accumulate on the tops of trees and on their branches. These large clumps of snow can fall off and cause injury (thus the term "tree bombs") during warm temperatures, on windy days or if you brush against or push a large tree. Best to avoid skiing under a tree with large hanging snow mushrooms on warm or windy days.
Skiing the Glaciers Glaciers can be some of the most beautiful and also some of the most dangerous places to ski. It cannot be overstated how important it is to follow close to the tracks of your guide and follow all directions closely. Glaciers can have avalanche terrain, icefalls, crevasses, moats and bergschrunds to contend with. It takes a trained eye and years of experience to properly assess these hazards. Icefalls are steep or overhanging walls of ice which form when a glacier flows over steep underlying bedrock or cliffs. Stopping directly below such an area is an invitation for disaster as they are unpredictable. They can often send large blocks of ice crashing down below them which can also trigger an avalanche. Having mentioned the hazard, it should also be mentioned that icefalls are also truly magnificent to photograph and can tower as high as 100m or 300 feet. Crossing rapidly below them may be a reasonable risk when an icefall has a history of relatively little activity. Don't stop directly below them to take a photograph! A moat and a bergschrund are similar features in that a moat is a hole in the ice or snow where the glacier recedes away from rock. A bergschrund is the uppermost crevasse on a glacier where the lower ice of a glacier separates from the upper ice of a steep snow or ice face. Detecting these features is based on knowledge of ice dynamics, local history for an area and subtle visual clues. Glacier crevasses, or large cracks in glacier ice, form when glacier ice flows over top of bedrock that is uneven in nature. Differences in the rates of flow in the ice over these underlying features make for areas of tension and areas of compression and thus cracks in the ice. Often crevasses can be ten meters wide, 50 meters deep and 100 meters long. Conversely they may also be so narrow that they are difficult to detect after several snowfalls. As the season progresses even moderately large crevasses get bridged over by the winter snow. Later in the season it may be safe to actually ski across some of these bridges that were open holes in the early season. In any case it is often best to ski with some distance between each skier rather than skiing all together in a bunch where the combined group weight may make a bridge fail. Crevasses can often be detected by knowing what a glacier looks like early in the season and memorizing the terrain. In addition, crevasses tend to form on convex slopes more readily than on concave slopes. A trained observer notices patterns of crevasses that relate to terrain features. Subtle clues that a crevasse may be ahead of you are a slight but noticeable depression in an otherwise uniform snow slope. This depression may be lighter in color after a recent snowfall or darker in color if dust has blown across and accumulated in the depression. Crevasses can be quite difficult to detect after a new snowfall or when visibility is poor. Don't ski, jump or turn on hollows or depressions on a glacier. Ski one at a time across obvious bridges and once again, follow your guide's instructions.
Cliffs and Cornices A cornice is a large overhang of windblown snow that often forms in the lee side of a ridge or mountain top. These overhangs can jut 10 or more meters (30 feet) into space. From above they simply look like a flat snow slope. Always stay well to the windward side of any ridge that you are not certain of. Best to ask you guide where it is safe to go along a mountain top or ridgeline. When cornices drop off they can take you for a nasty ride down a mountainside without your skis and they can also start avalanches when they fail. Don't stand on top of them and stay out from below. Avalanches often start below corniced areas as these are often areas of snow deposition and "slab" formation during wind and storms. Cliffs can vary from a few feet in height to over a hundred feet (30m) or even more. Never pass your guide and never take a jump on skis or snowboard unless your guide has said it is OK. Snowboarders often love taking hits (jumps) and should discuss when it will be OK to take air. It is usually a good idea to have the guide or a trusted partner check out the landing before committing. Boarders like to joke that you can't get hurt in the air, but the landing is another matter altogether. If you are fond of air, talk to your guide in advance and they may be able to line you up with some good lifters as the day rolls on.
Valley Bottoms and Creek Beds As you ski down toward the bottom of a run you may encounter creeks or gulleys that may not be totally covered over with snow. Your guide will often select a safe place to cross on a snow bridge if required. Cross one at a time in the guide's track if requested to do so and always have a partner watch you. If a bridge fails and you fall in without assistance you could become hypothermic or even drown.
Ski Sober To ensure the safety of yourself and the other group members you must refrain from alcohol and drug use while on a heli trip. Anyone breaking this rule may be immediately barred from skiing or boarding for the duration of the day. Smokers should not smoke anywhere near the aircraft or fueling systems. Ask your guide or pilot about a suitable location to have a cigarette.
The Games Skiers Play If you are on a snowboard and you like making wide arcing turns it is best to board near the end of the group and make your turns starting on one side of the groups tracks, cross the tracks then turn again on the other side of the groups tracks to recross the tracks in the other direction. In this way you can avoid the problem of being too far from the guide's line during your huge turns. When you come down to the end of a pitch, DO NOT PASS THE GUIDE. Slow down as you approach the group to avoid hitting the guide or other group members. Turn and watch approaching skiers so that you can see any potential problems if a skier loses control near the group. Better skiers can try making figure 8 sets of tracks or spooning tracks in figure S. This can really improve your rhythm and powder technique if you are ready for it. Three advanced boarders can intertwine tracks in a variation on the figure 8 theme. Ask your guide to photograph or video tape your efforts when it works in with the day's program.
Final Thoughts So there you have a short primer on how to prepare for your heli experience. Everything from clothing to technique and even some of the hazards that your guide will attempt to keep you from encountering during a typical day of boarding and skiing. Although the hazards are ever present and real, every day of every winter, hundreds of people in Western Canada safely maneuver through them in the company of their guide. Only you can decide if the risks are acceptable to you. If you decide to accept the risks, be prepared for what many people consider to be one of the very best days of their lives. Stand by for a heli adventure and stay alert!
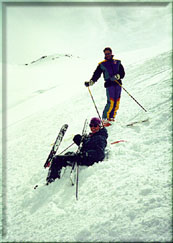 It is a lucky person indeed who doesn't fall during their first day of powder skiing. It is nothing to be afraid of and certainly nothing to be ashamed of. A simple fall in powder rarely produces any injury unlike the bone rattling falls that can occur during icy conditions at a ski hill.
![[ ACMG logo ]](../../images/acmgbw100.gif)
![[ UIAGM logo ]](../../images/ifmgabw100t.gif) Since there are no marked hazards and no groomed runs you have to be alert for problems while boarding or skiing. Before we mention the various things you can do to enhance your own safety, please remember the first three rules of heli-skiing and boarding:
Since there are no marked hazards and no groomed runs you have to be alert for problems while boarding or skiing. Before we mention the various things you can do to enhance your own safety, please remember the first three rules of heli-skiing and boarding:
 Your guide will ski down the run first and take frequent breaks. Unless directed otherwise, you will be free to ski or board on either side of their tracks with not more than a meter between each set of tracks. Everyone should not ski at once. Allow the boarder / skier ahead of you to start out and get about ten meters or ten turns ahead before you start. In this way each member of the group has plenty of room and doesn't have to worry about hitting the boarder or skier next to him / her. Weaker skiers may not want to always ski at the back of the group and everyone in the group should have a turn at skiing behind the guide. Early in the day the guide may ask weaker skiers or those having problems to ski right after him / her so that personal instruction on ski technique can be given.
Rescue Dynamics
5109 - 17A Avenue NW
Edmonton, AB, Canada T6L 1K5
phone (780) 461 - 5040 voice / fax
Copyright © 1999 Cyril Shokoples
All rights reserved. Terms & Conditions apply.
Last updated